Hello bakers,
Just to let you know that I've decided to move I Dream in Buttercream over to Wordpress and this is where I'll be posting all future recipes - THIS BLOGGER ACCOUNT WILL NO LONGER BE USED!
Please check out my new blog here: https://cloud9point1.wordpress.com/
Happy caking!
Cloud9.1 x
Wednesday 10 June 2015
Thursday 21 May 2015
Banana Toffee Cake with Brown Sugar Buttercream
As a keen and frequent baker, I'm not quite sure why I'd never made banana bread/cake before as I love bananas and it's pretty much a failsafe creation. In fact, it almost seems to be a rite of passage recipe for those who begin to pursue an interest in baking. Anyway, when the time came to make a cake for my mum and dad's joint birthday celebrations back in April, I wanted to make something different that I hadn't tried before which would be indulgent but not too complicated. I decided to do a banana cake but with added toffee flavouring, and paired with a brown sugar buttercream and chopped up Caramac and Chomp bars for extra celebration-appropriate banoffee decadence.
I found that the brown sugar buttercream was a bit looser than normal frosting but if you need it to be stiffer just add in some extra icing sugar.

INGREDIENTS
For the cake:

I found that the brown sugar buttercream was a bit looser than normal frosting but if you need it to be stiffer just add in some extra icing sugar.
INGREDIENTS
For the cake:
- 225g self-raising flour
- 100g granulated/caster sugar
- 90g dark brown sugar
- 225g butter/margarine
- 2 ripe/over-ripe bananas, peeled and mashed
- 1 tsp vanilla extract
- 1 tsp Lakeland buttery caramel flavouring (optional but delicious)
- 0.5 tsp baking powder
For the buttercream/topping:
- 100g butter
- 100g dark brown sugar + a few pinches for sprinkling
- 100g icing sugar
- Few drops of Lakeland buttery caramel flavouring (again, optional but so good!)
- 2 Chomp bars (or other toffee/caramel chocolate)
- 1 Caramac bar
METHOD
For the cake:
For the cake:
- Pre-heat the oven to 180 degrees C and line two round baking tins with parchment paper.
- Whisk the butter/margarine and sugars together in a large mixing bowl until pale then whisk in the eggs,
- Fold in the flour, mashed bananas, vanilla extract, caramel flavouring and baking powder until a batter of a soft dropping consistency has formed.
- Pour the mixture into the prepared cake tins then pop in the oven and bake for around 20-25 minutes until a cocktail stick inserted into the sponges comes out clean.
- When baked, leave the cakes to cool on a wire rack before turning them out of the tins. At this stage the sponges can be frozen for decorating at a later date if you wish.
For the buttercream/topping:
- Place the butter, caramel flavouring and brown sugar in a bowl then whisk while gradually adding the icing sugar until a smooth mixture has formed.
- Spread half of the buttercream on one of the sponges then sandwich the other on top, then spread the rest of buttercream on the top layer.
- Chop the Caramac and Chomp bars into small squares using a sharp knife or scissors then place them on top of the cake before finishing off with a few sprinkles of brown sugar.

I also used this recipe to make cupcakes to take to my old workfriends :) The above quantities will yield about 12-15 cupcakes.
Tuesday 19 May 2015
World Baking Day!
Just a quick post to say that my submission to World Baking Day's 'Victory Bakes' on Twitter received a rosette :) My contribution was the birthday cake I made for my best friend's birthday last July - Victoria sponge filled with jam and fresh cream and decorated with white chocolate finger biscuits, strawberries and purple glitter, adorned with shortbread hearts as a finishing touch. I chose this cake because a) although it was actually very easy to make, I think it looks the most impressive and professional of all my bakes, and b) World Baking Day is about baking for someone you love and my bestie Danielle is one of the people I love most in this world!


On the actual day (Sunday 17th May) I made some rhubarb & custard and peanut butter & chocolate thumbprint cookies for my parents and their friends who came over for dinner - recipe will be up on the blog soon :)
Did you participate in World Baking Day? If so, what did you make and who was the lucky recipient?
Sunday 10 May 2015
Lemon Crunch Cupcakes
Isn't it funny how sometimes the most hurried and improvised of culinary creations turn out the most delicious? Like these yummy little cakes - they came about almost by accident but I'm glad they did as I'll definitely be making them again, especially now spring is here! I fancied making some cupcakes that were quick and straightforward but a bit different from ones I'd made recently, and I remembered I had a couple of lemons in the freezer (yes, you can freeze lemons! The insides go quite mushy but they still keep their flavour and juicyness), so I thought I'd have a go at lemon drizzle cakes. I then found that a) my grater was too blunt to grate the lemon zest for the sponge and b) I didn't have any icing sugar. I improvised by adding the juice to the batter instead, convinced that its acidity would stop the cakes from rising or just generally make them taste funny, but they came out beautifully with a subtle zing :) Unable to make icing, I simply created a slapdash mixture of granulated sugar and the rest of the lemon juice and plonked it on the tops of the cupcakes around 5 minutes before they were due to come out of the oven. The result was a lovely sweet but citrussy crunchy topping which is very reminiscent of the traditional pancake topping! You can use as much or as little topping as you like depending on how sweet you want the cakes but you don't need a great deal to get the texture and flavour.


I love how the topping looks like a crisp winter frost!
INGREDIENTS - makes approx. 10-12 cupcakes
For the cakes:
- 125g self-raising flour
- 115g caster/granulated sugar
- 115g butter/margarine
- 2 eggs
- Juice of half a lemon
- Pinch of baking powder
For the topping:
- 1 tbsp granulated sugar
- Juice of half a lemon
METHOD
- Pre-heat the oven to 180 degrees and line a cupcake/muffin baking tray with 12 paper cases.
- Whisk the butter/margarine together in a large mixing bowl until pale then whisk in the eggs.
- Fold in the flour, lemon juice and baking powder until a batter of a soft dropping consistency has formed.
- Drop the mixture into the cake cases using a teaspoon until they're each about two thirds full.
- Pop in the oven and then prepare the topping by mixing the sugar and remaining lemon juice together roughly in a bowl.
- After around 8-10 minutes, remove the cakes from the oven and spread the sugar and lemon juice mixture over the tops - this is quite fiddly as it's so sticky but I found the easiest way to do it was using my fingers.
- Place the cakes back in the oven and bake for a further 5 minutes until a cocktail stick inserted into the sponge comes out clean.
- When baked, place on a wire rack and leave to cool before enjoying.
Tuesday 28 April 2015
No-Bake Oaty Peanut Butter Squares
These squares are my favourite things to make when I fancy some homemade treats but can't be bothered to switch on the oven and create lots of washing up, or when I want something yummy that's not as heavy as cake. They really couldn't be easier to whip up and the salty crunchiness of the peanut butter goes amazingly well with the sweet honey and chocolate chips.
Although I wouldn't call these creations 'healthy', they're certainly a bit less sinful than a doorstop of frosted cake or a big gooey chocolate cookie. Having said that, they're so ridiculously moreish that I find myself unable to stop at just one and could happily devour an entire batch in one sitting - and that definitely doesn't constitute a guilt-free snack!

INGREDIENTS
Although I wouldn't call these creations 'healthy', they're certainly a bit less sinful than a doorstop of frosted cake or a big gooey chocolate cookie. Having said that, they're so ridiculously moreish that I find myself unable to stop at just one and could happily devour an entire batch in one sitting - and that definitely doesn't constitute a guilt-free snack!
INGREDIENTS
- 300g oats
- 240g crunchy peanut butter
- 120g honey
- 60g dark chocolate chips
- Pinch of salt
METHOD
- Line a rectangular cake tin with baking parchment or clingfilm.
- Place the peanut butter and honey in a saucepan and stir on a low heat until smooth and melted together.
- Pour in the oats, chocolate chips and salt and mix with a wooden spoon until all the oats are covered.
- Pour the mixture into the prepared tin and press down with the wooden spoon to form an even layer.
- Place in the fridge to set for a minimum of 1 hour before slicing into squares with a sharp knife.
Tuesday 14 April 2015
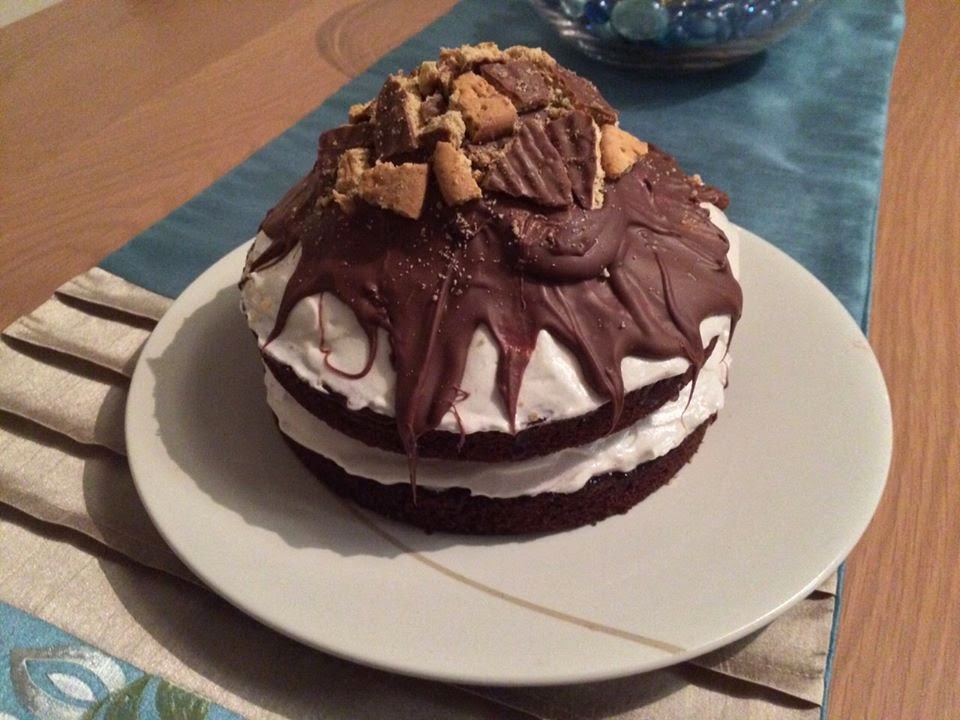
Chocolate Teacake Cake
Before Easter I was struck down with gastroentiritis and it was an utterly horrendous experience. Crippling stomach pains and the inability to eat anything but dry crackers and ginger nut biscuits for over a week meant I was fantasising about the day I could finally stuff my face with indulgent food again, and I swore I'd treat myself by making a big decadent cake when I was better. Luckily, I recovered in time for the Easter weekend and decided to set myself the challenge of baking something chocolatey that didn't involve Mini Eggs or Creme Eggs. Don't get me wrong, I LOVE Mini Eggs and Creme Eggs but I thought it'd be fun to try something outside-the-box. The result was a creation inspired by one of my favourite treats, chocolate teacakes, with their heavenly combination of fluffy marshmallow filling, strawberry jam, biscuit base and a crisp chocolate coating. The flavours and textures transfer really well into cake form and it was a lot of fun to make, especially the mountain of meringue frosting topped with a chocolate shell!
Freezing the marshmallow frosting for five minutes before pouring on the melted chocolate is a great tip I picked up from a recipe for hi-hat cupcakes and it really works! Make sure you don't omit this step or you'll end up with a runny, melty mess. Also, as I mentioned in my Neapolitan Cake post, although beating egg white with icing sugar makes for a deliciously marshmallow-like frosting, it doesn't last well and will begin to shrink after a couple of days. The cake will still be delicious but it won't look as good!
Freezing the marshmallow frosting for five minutes before pouring on the melted chocolate is a great tip I picked up from a recipe for hi-hat cupcakes and it really works! Make sure you don't omit this step or you'll end up with a runny, melty mess. Also, as I mentioned in my Neapolitan Cake post, although beating egg white with icing sugar makes for a deliciously marshmallow-like frosting, it doesn't last well and will begin to shrink after a couple of days. The cake will still be delicious but it won't look as good!
INGREDIENTS
For the cake:
- 225g self-raising flour
- 225g caster/granulated sugar
- 225g butter/margarine
- 4 eggs
- 2 heaped tbsp cocoa powder
- 2 tsp vanilla extract
For the frosting/filling/topping:
- 2 egg whites
- 4 tbsp icing sugar
- 2 tsp vanilla extract
- 2 tsp golden syrup
- 0.5 tsp cream of tartar (optional but helps to stabilise the mixture)
- 5 tbsp (approx.) strawberry jam
- 100g milk chocolate
- 3-4 milk chocolate or plain digestive biscuits
METHOD
For the cake:
- Pre-heat the oven to 180 degrees C and and line two round baking tins with parchment paper.
- Whisk the butter/margarine and sugar together in a large mixing bowl until pale then whisk in the eggs.
- Fold in the flour, cocoa powder and vanilla extract until a batter of a soft dropping consistency has formed.
- Pour the mixture into the prepared cake tins then pop in the oven and bake for around 15-20 minutes until a cocktail stick inserted into the sponges comes out clean.
- When baked, leave the cakes to cool on a wire rack before turning them out of the tins. At this stage the sponges can be frozen for decorating at a later date if you wish.
For the frosting/filling/topping:
- Spread the strawberry jam generously across the top of one of the cooled sponges.
- Separate the egg whites into a clean bowl and whisk with the vanilla extract, golden syrup and cream of tartar, while adding the icing sugar a few teaspoons at a time, until stiff peaks form - you should ideally do this for a minimum of 7-10 minutes.
- Spread about a third of the frosting on top of the jam-covered sponge using a palette knife then sandwich the other sponge on top.
- Spread the rest of the frosting on top of the cake to form a mountain - pile it up as high as possible - then place in the freezer for about 5 minutes until it's fairly firm.
- While the cake is in the freezer, place the chocolate in a heatproof bowl and melt over a pan of hot water or in the microwave in blasts of 30 seconds until smooth.
- Remove the cake from the freezer and immediately pour the melted chocolate over the top of the frosting mountain so that it drizzles down the sides.
- Crush the digestive biscuits into chunks by hand and place on top of the chocolate covering then leave to set before serving.
Saturday 21 March 2015
Custard Cream Cake
This recipe is basically a large version of the cupcakes I created but never got round to blogging about after being inspired by the custard cream biscuits I made here: http://cloudninepointone.blogspot.co.uk/2013/10/custard-creams-strawberry-milkshake.html.
I made this quick and simple cake on a whim while round my other half's after discovering he had custard powder in the cupboard and it was absolutely scrumptious with its light sponge, smooth icing and lovely vanilla flavour. If you want to make it a bit more of a 'show stopper' bake by all means double the quantities and make as a double layer cake sandwiched with extra custard buttercream and top with some custard cream biscuits or other decorations to finish, but if you're just after something delicious with minimal faff then look no further than the recipe below :)

I made this quick and simple cake on a whim while round my other half's after discovering he had custard powder in the cupboard and it was absolutely scrumptious with its light sponge, smooth icing and lovely vanilla flavour. If you want to make it a bit more of a 'show stopper' bake by all means double the quantities and make as a double layer cake sandwiched with extra custard buttercream and top with some custard cream biscuits or other decorations to finish, but if you're just after something delicious with minimal faff then look no further than the recipe below :)
I love the sunshine yellow colour!

INGREDIENTS
For the cake:
For the cake:
- 160g self-raising flour
- 170g caster/granulated sugar
- 170g butter/margarine
- 3 eggs
- 2 heaped tbsp custard powder
- 2 tsp vanilla extract
For the custard buttercream icing:
- 100g icing sugar
- 50g butter (unsalted if preferred)
- 1 tbsp custard powder
- 1 tsp vanilla extract
METHOD
For the cake:
- Pre-heat the oven to 180 degrees C and line a round cake tin with baking parchment.
- Whisk the butter/margarine and sugar together in a large mixing bowl until pale then whisk in the eggs.
- Fold in the flour, custard powder and vanilla extract until a batter of a soft dropping consistency has formed.
- Pour the mixture into the prepared cake tin and bake in the oven for around 20-25 minutes until a cocktail stick inserted into the sponge comes out clean.
- When baked, leave to cool on a wire rack before turning the sponge out of the tin. At this stage the cake can be frozen for decorating at a later date if you wish.
For the icing:
- Place the butter and vanilla extract into a bowl and whisk while gradually adding the icing sugar and custard powder until a thick, fluffy mixture has formed.
- Spread the icing onto the top of the cooled cake using a palette knife, then dive in!
This recipe can also be used to make cupcakes (yields around 10-12) instead of one large cake:
Tuesday 10 March 2015
Neapolitan Cake
I've been sticking to lower fat/sugar bakes for the last couple of months as part of my new year (mostly) healthy eating regime but last weekend while back home at my parents' I was desperate to just go nuts and make a proper double decker sponge with lashings of scrummy frosting. I've wanted to try a tri-colour Neapolitan ice cream inspired cake, with layers of chocolate, vanilla and strawberry, for a while so this was the perfect time to give it a go. I'm really pleased with how it turned out and think it looks really pretty and cheery!
The frosting I used in this recipe is just egg white beaten with icing sugar plus flavouring and food colouring and this makes for a lovely light, almost marshmallow-like texture which is less sickly than buttercream. However, a word of warning: it starts to shrink and evaporate after 24 hours or so so if you're making the cake in advance I'd recommend using buttercream icing instead as it will last much longer.
Side note: A lot of my previous cake recipes on here have listed the quantities in ounces but I've decided to start using metric only from now on in order to be consistent.

For the cake:
The frosting I used in this recipe is just egg white beaten with icing sugar plus flavouring and food colouring and this makes for a lovely light, almost marshmallow-like texture which is less sickly than buttercream. However, a word of warning: it starts to shrink and evaporate after 24 hours or so so if you're making the cake in advance I'd recommend using buttercream icing instead as it will last much longer.
Side note: A lot of my previous cake recipes on here have listed the quantities in ounces but I've decided to start using metric only from now on in order to be consistent.
INGREDIENTS
For the cake:
- 225g self-rasing flour
- 225g caster/granulated sugar
- 225g butter/margarine
- 4 eggs
- 2 heaped tbsp cocoa powder
- 2 tsp vanilla extract
- 50g chocolate chips (optional but very yummy)
For the icing/jam filling:
- 1 egg white
- 2 tbsp icing sugar
- 1 tsp strawberry extract
- Few drops of red food colouring
- Handful coloured vermicelli
- 4 tbsp (approx.) strawberry jam
METHOD
For the cake:
For the cake:
- Pre-heat the oven to 180 degrees C and line two round baking tins with parchment paper.
- Whisk the butter/margarine and sugar together in a large mixing bowl until pale then whisk in the eggs.
- Fold in the flour and vanilla extract until a batter of a soft dropping consistency has formed.
- Separate half of the mixture into a second bowl and and fold in the cocoa powder and chocolate chips.
- Pour the mixtures one each into the two cake tins.
- Pop in the oven and bake for about 15-20 minutes until a cocktail stick inserted into the sponge comes out clean.
- When baked, place on a wire rack and leave to cool before turning the cakes out of the tins. At this stage the cakes can be frozen for decorating at a later date if you wish.
For the icing/filling:
- Spread the strawberry jam onto the top of the cooled chocolate sponge and sandwich the vanilla sponge on top.
- Separate the egg white into a clean bowl and whisk with the strawberry extract until stiff peaks form while adding the icing sugar a few teaspoons at a time.
- Add the food colouring a couple of drops at a time and whisk again until you have your desired shade of pink.
- Spread the icing over the top of the cake using a palette knife - tap roughly with the palette knife to achieve the fluffy effect in the photo - and then sprinkle with vermicelli as a colourful finishing touch.
Tuesday 3 March 2015
Fabulous Biscotti
I first made these lovely crisp biccies, which go perfectly with a cuppa, with raisins and dark chocolate chips using a brilliant recipe from the Hairy Dieters as inspiration when on the hunt for lower fat/calorie bakes that still delivered a sweet hit. They turned out fantastically and have since become a bit of a signature bake of mine. I love how easy and versatile this recipe is - once you've got the basic biscotti dough you can add pretty much anything you want for flavour; chocolate, spices, citrus zest, dried fruit, nuts...the list is endless!
The original version made with orange zest, dark chocolate chips and dried cranberries weighed in at only 53 calories a piece so, although I can't give an exact estimate when other ingredients are added, the chances are they're still reasonably sin-free provided you don't go too mad with the sugary extras!
I know traditionally biscotti is made with almonds but I always use almond extract as I love the delicate flavour it gives. By all means use whole almonds if you prefer though.
I made these cherry and white chocolate ones for Valentine's Day :)
INGREDIENTS - makes approx. 20 pieces

- 180g self-raising flour
- 80g caster sugar
- 1 egg + 1 egg white*
- 40g white chocolate chips (or other chocolate/ingredient of choice)
- 40g glace cherries, chopped into chocolate chip sized pieces (or other dried fruit/ingredient of choice)
- 1 tsp almond extract
- 1 tsp vanilla extract
- 0.5 tsp baking powder
METHOD
- Pre-heat the oven to 180 degrees C and line a large flat baking tray with parchment paper.
- Mix the dry ingredients together in a large bowl then add the chocolate chips, cherry pieces and almond extract.
- Beat the egg and egg white together along with the vanilla extract for around 1 minute and pour into the mixture.
- Mix with a wooden spoon and then your hands until the ingredients come together to form a stiff dough. If it's too sticky add a little more flour and if it's too dry and crumbly add a splash of milk.
- Roll the dough into a sausage shape about 25-30cm long and place on the baking tray then gently flatten it until it's about 2cm tall.
- Place in the oven for around 25-30 minutes until the dough is firm with a crust but still fairly pale.
- Remove from the oven and reduce the heat to 140 degrees C then allow the dough to cool for around 10 minutes before sawing into pieces about 2cm thick using a serrated knife.
- Place the biscuits back on the baking tray and cook for a further 25 minutes or until lightly browned then leave to cool before enjoying with tea or coffee.
*Please don't throw the spare yolk away if at all possible! It can be used in homemade burgers, Welsh rarebit or eggy bread, among other things (sorry, I just really hate waste!)
Edit: I made these decadent double chocolate biscotti for my friend's birthday by following the above recipe but omitting the almond extract, replacing two heaped tablespoons of flour with cocoa powder and substituting dark chocolate chips in place of the cherries:
Edit: I made these decadent double chocolate biscotti for my friend's birthday by following the above recipe but omitting the almond extract, replacing two heaped tablespoons of flour with cocoa powder and substituting dark chocolate chips in place of the cherries:
Sunday 22 February 2015
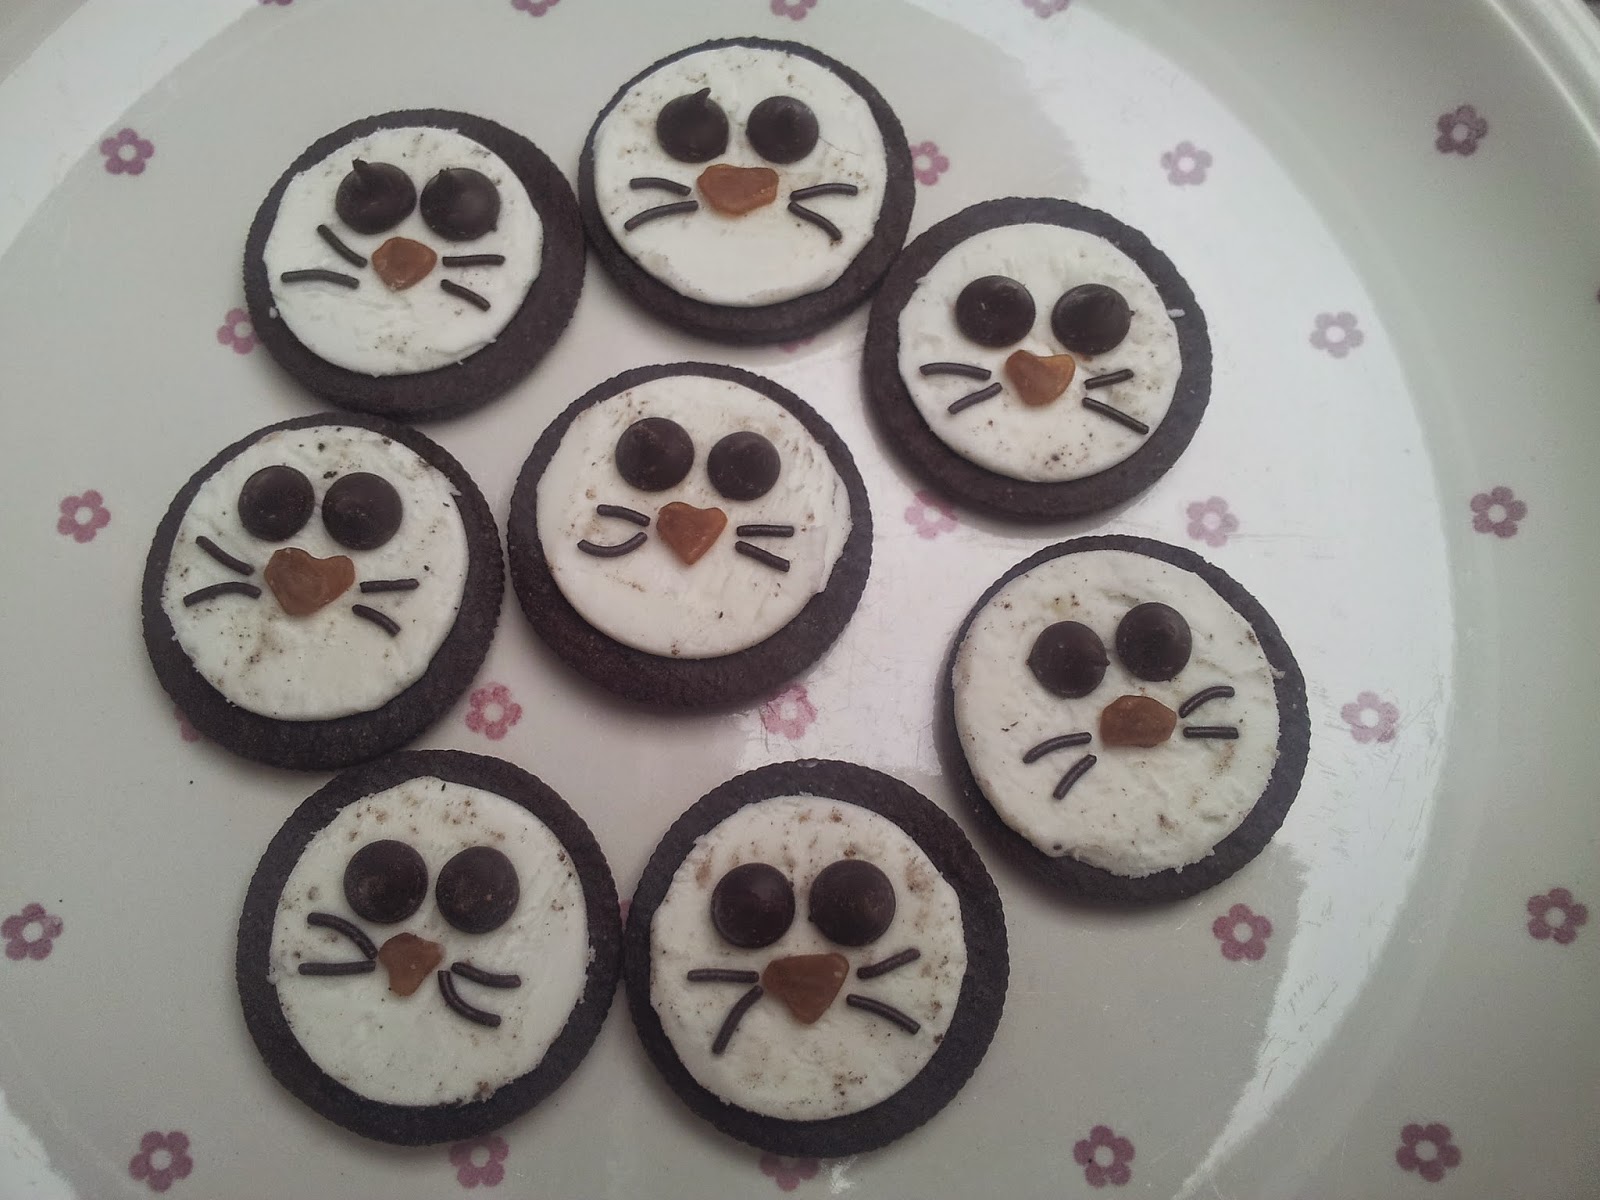
Sealy Oreos
No actual baking required but just wanted to make a quick post about these cute cookies I made as a surprise for my Oreo-loving other half as part of Valentine's Day dinner. They were inspired by The More Than Occasional Baker's adorable penguin Oreos which can be found here: http://themorethanoccasionalbaker.blogspot.co.uk/2015/02/penguin-oreos-for-valentine.html?m=1
Anyone that knows me knows I have a bit of a seal obsession, hence the adaptation - I just think they're so so cute! Separating the cookies without breaking them and keeping the cream intact is easier said than done and putting the little whiskers on is a bit fiddly but they're fun to make and sure to raise a smile :)
INGREDIENTS - makes 8
- 8 Oreo cookies
- 16 dark chocolate chips
- 8 butterscotch chips
- Handful chocolate vermicelli
METHOD
- Use a sharp knife to carefully remove one side of each Oreo and put the non-cream halves to one side.
- Use the knife to gently scrape any excess crumbs off the cream.
- Place pairs of chocolate chips at the top of each cookie as eyes then add the butterscotch chip noses and use tweezers to arrange four vermicelli whiskers on each.
Subscribe to:
Posts (Atom)